Setup Nvidia MIG vGPU on Openstack

hello all welcome back to my blog, in my previous post I wrote about how to setup vgpu in openstack, and in this post, I’ll explain to setup vgpu but with MIG configuration.
Mig or Multiple Instance GPU is nvidia technology that isolates vgpu or more like partitions the gpu.
1
2
3
The new Multi-Instance GPU (MIG) feature allows GPUs (starting with NVIDIA Ampere architecture) to be securely partitioned into up to seven separate GPU Instances for CUDA applications, providing multiple users with separate GPU resources for optimal GPU utilization. This feature is particularly beneficial for workloads that do not fully saturate the GPU's compute capacity and therefore users may want to run different workloads in parallel to maximize utilization.

For Cloud Service Providers (CSPs), who have multi-tenant use cases, MIG ensures one client cannot impact the work or scheduling of other clients, in addition to providing enhanced isolation for customers.
in the short term you can anology mig is like a CPU Affinity and Pinning but on this was on GPU. unlike CPU Affinity and Pinning since this product was not opensource so I didn’t thing if we could allocate how many gpu core or create any costumization core sizes (in example: create a flavor with 100 gpu core) and because of that nvidia already created the mig profile.

also, the performance will increase if we use mig as vgpu backend
well, I thing I’m already talking too much hehehe, you shouldcan explore by ur self.
since this was my second post about vgpu so i assume you already understand&enable about SR-IOV and nvidia driver.
let’s start with enabling mig
1
nvidia-smi -i 0 -mig 1
oIn that pic I had two gpu, 0000:41 and 0000:81 on this case I want only enabling mig only on 0000:41 or gpu 0 if you want to enable all gpu just remove -i 0 but make sure no one uses the gpu at that time
to make sure the mig already running or not you can see with this nvidia-smi -i 0 -q
also you can check with this nvidia-smi -i 0 --query-gpu=pci.bus_id,mig.mode.current --format=csv

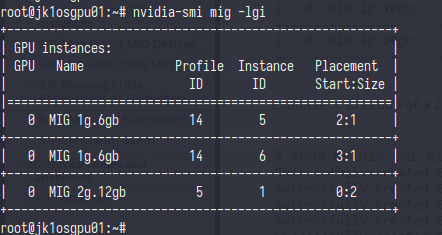
now let’s see how many mig profiles this gpu has
as we can see I only have a 5 mig profile and some profiles have me or media extensions (tbh i still don’t very clear why +me profile can provide only one vgpu even though the profile was not 24G)
so on this case i want to use 12G and 6G + 6G with this formula i can create 3 vm with one 12G and two 6G

5,19,19 on this argument was id of mig profile
list the profile that we chose
and the last is to apply the profile
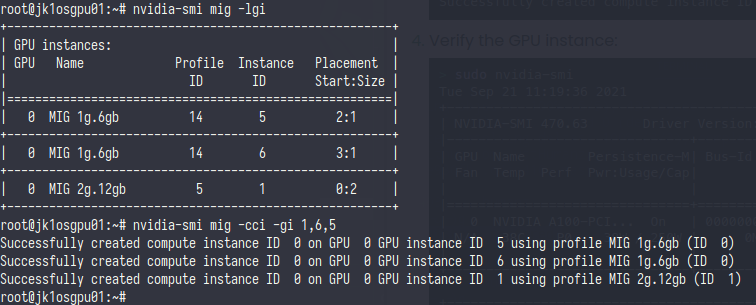
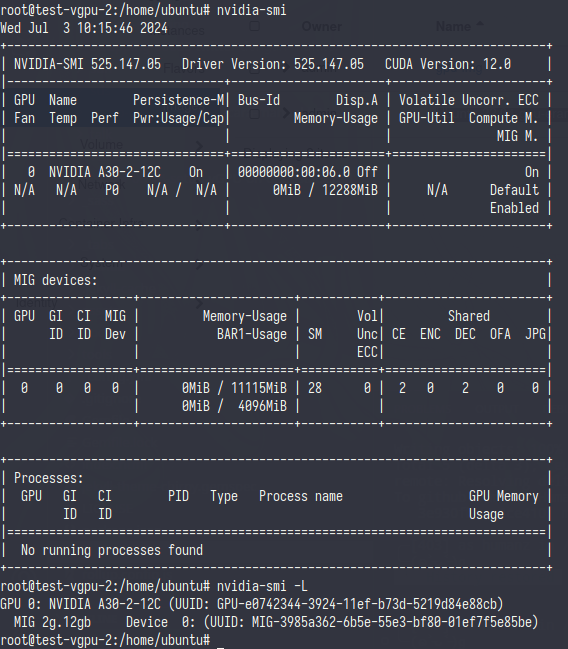
now we can check it with nvidia-smi -L

ok now the mig profile is already created, let’s create the SR-IOV so the vm can use it
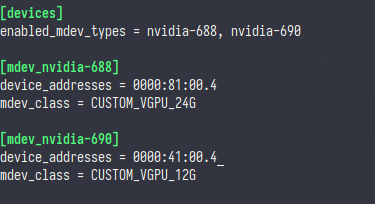
first let’s check the mig profile through mdev
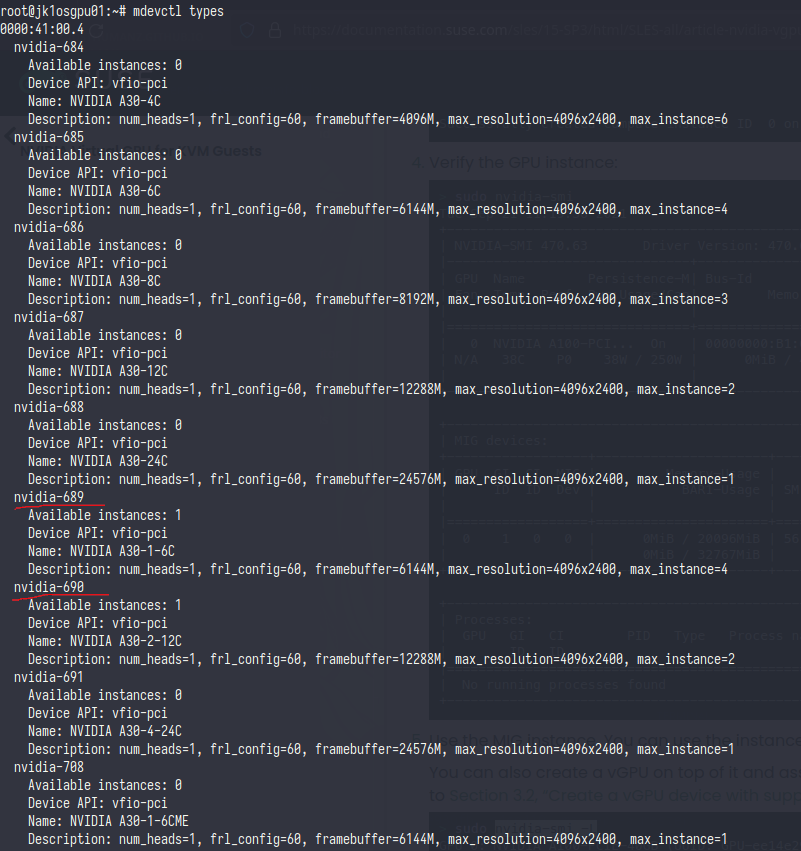
it shows if we only have two profiles that we can use and that profile matches with mig profile that we already chose
now let’s create the SR-IOV like we usually
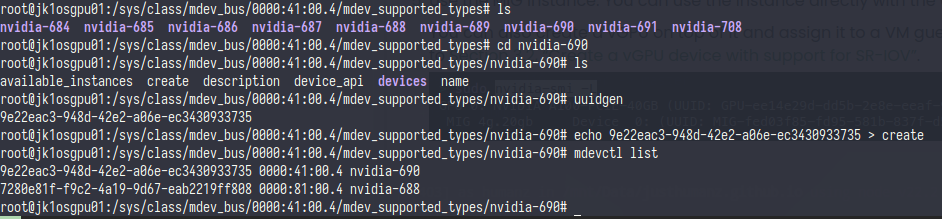
great now we already have the SR-IOV mdev let’s continue to nova and try it
edit the nova config
1
nano /etc/kolla/nova-compute/nova.conf
also don’t forget to restart the nova compute service
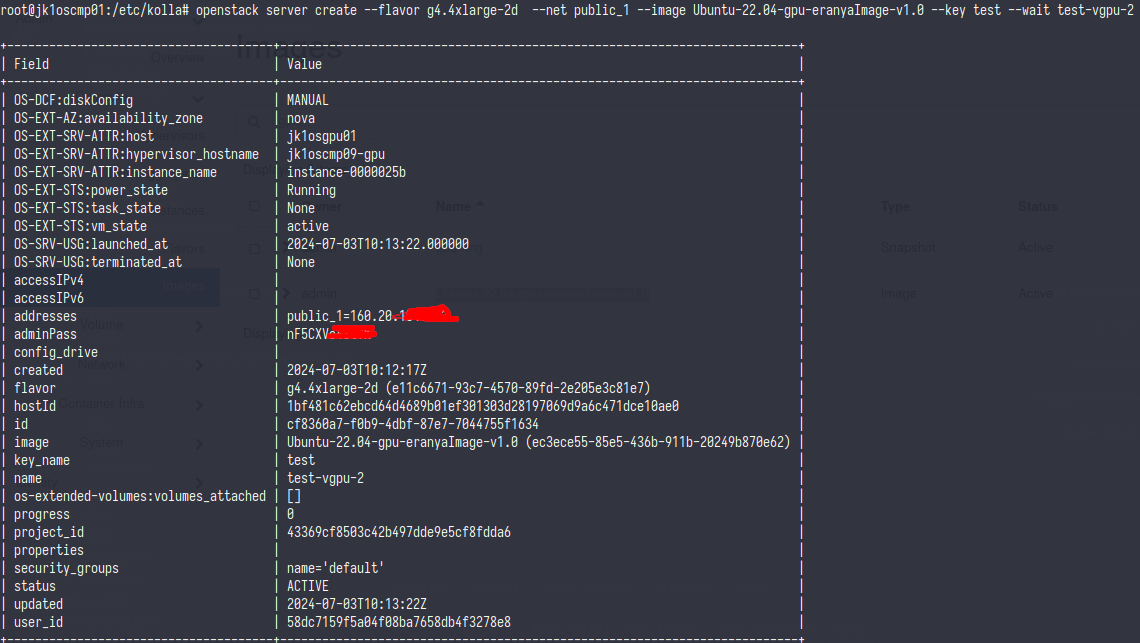
and create vm then check it from vm
and that’s all, thx
Source:
- https://documentation.suse.com/sles/15-SP3/html/SLES-all/article-nvidia-vgpu.html
- https://developer.nvidia.com/blog/dividing-nvidia-a30-gpus-and-conquering-multiple-workloads/
- https://docs.nvidia.com/datacenter/tesla/mig-user-guide/index.html
Comments powered by Disqus.